Setting up new employee and personnel information
4.1
Employee list
4.1.1 Add employee information individually
Steps:
1)
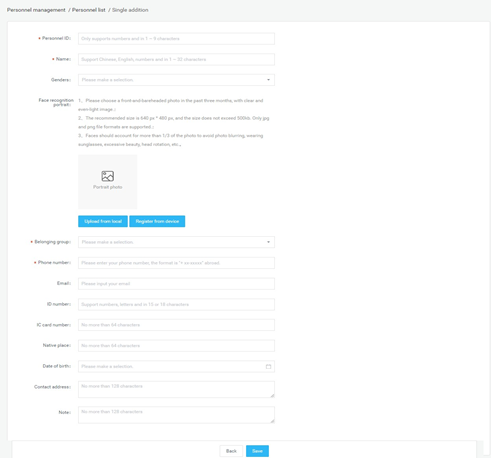
In [Employee list], click the "Single addition" button to enter
the employee addition page; 2) Fill in the personnel ID, name, gender,
belonging group, phone number, ID card number, IC card number, nationality, place of birth, date
of birth, contact address and notes. Add a face
recognition photo and click
"Save" to complete the employee creation operating.
Steps:
Upload a face recognition photo description
· Upload from local
Click "Upload from local" to open
the local folder, select the jpg and png portrait photos in the folder.
Note: Portrait photo specifications
1. Please choose a front-and-bareheaded photo in
the past three months, with clear and even-light image.
2. The recommended size is 640 px * 480 px, and the
size does not exceed 500kb. Only jpg and png file are supported.
Click "Upload from local" to open
the local folder, select the jpg and png portrait photos in the folder.
Note: Portrait photo specifications
1. Please choose a front-and-bareheaded photo in
the past three months, with clear and even-light image.
Faces
should account for more than 1/3 of the
photo, avoiding photo blurring, wearing sunglasses, excessive facial-up, and
head rotations
Register from device
Register from device
Click
"Register from Device" to open the Select Device window and select an
online device. Once determined, the device will enter the .
photo state. After
the photo is taken and verified, the photo will be sent back here from the
client.
Click
"Register from Device" to open the Select Device window and select an
online device. Once determined, the device will enter the .
photo state. After
the photo is taken and verified, the photo will be sent back here from the
client.
4.1.1 Import employee information in bulk
Steps: In the [Employee list], click the "Add in Bulk
- Information Import in Bulk" button.
1)
First step click "Download Template".
Download the excel template file to your computer with the file name
"Personnel_import_template.xls". Then fill in the employee
information in bulk.
2)
In the second step, click "Upload excel file". Select the excel file with the employee information
filled in and upload it. If the file is uploaded successfully, the upload
success status and file name will be displayed.
3)
In the third step, click "Start import". During the import,
there will be a progress bar showing "Importing personnel information (1 /
total number of people)". After the import is completed, it prompts
"Successful batch import of personnel information". After the import
is completed, return to the [Person List] to view the imported personnel information.
·
Import without overwriting: When importing a file two or more times,
duplicate employees are not imported. And the system will prompt abnormal
duplicate information.
·
Overwrite import: The second import will overwrite the information of the
employee that was imported for the first time without prompting for duplicate information.
Description of import failure exception
· The content or format of the uploaded excel file is incorrect and does not meet the template specifications. Click to start the import, and a prompt will appear: "The file content or format is incorrect. Please fill in the employee information according to the template requirements.
4.1.3 Import portrait photos in bulk
Steps: In the [Employee list], click the "Add in bulk
- Portrait import in bulk".
1)
Step 1 click "Zip file selection" to open the Select Folder window
and select the file upload. After the file upload is successful, the current
file storage path is displayed.
2)
Step 2 click "Start Import", and a progress bar will be displayed
during the import: the number of imported files / the total number of folders.
And there will be a prompt message: x sheets have been successfully imported; x
sheets failed. After the import is complete, the progress bar displays: The
portrait photos in this folder have been imported.
Description of portrait import rules
·
[Portrait file naming] The naming of the portrait file needs to
correspond to the personnel ID. After
the upload is successful, the corresponding person portrait information can be
viewed in the person list.
·
[Format and size] Only two file formats of jpg and png are supported, and
the size of each portrait file must not exceed 500k. Files that do not meet the
requirements will not be imported.
·
[Portrait Restriction] Faces need to account for more than 1/3 of the
photo. Please choose a front-faceless
photo in the past three months. The avatar is clear, and the light is uniform.
Avoid the avatar cannot be used for face recognition.
·
portrait photos in the specified
folder and select the folder to import.
Description
of failed portrait import
If the size of an image file does not meet the
requirements, the import will fail. After that, a table will appear to display
the information of the portrait file that has not been successfully imported.
After modification, you can re-import.
4.1.4 Export employee information
In [Employee
list], click the "Export" button to export all employee information
in the list to the file "Employee Information.xls" and download it.
4.1.5 Refresh employee information
In [Employee
list], click the "Refresh" button to refresh all employee information
in the list to the latest state.
4.1.6 Staff details and editing
Employee details
In [Employee
list], after corresponding employee information, click the "Employee
details" button, you can enter the details page to view specific employee
information.
·
Employee edits
On the details
page, click the edit button to modify the employee's basic information and
photo information. After modifying the information, click Save.
Employee
grouping uses the organizational structure grouping by default. There is a
default employee grouping under each user group. You can add, modify, or delete employee groupings on the user
group by yourself. The operation is similar to the user grouping in [Group Structure].
4.2 Visitor management
Visitor management is used to view, add, edit, and export visitor
information.
Steps:
1) In [Visitor Management], click the "Single Add" button to enter the visitor adding page.
2) Fill in the visitor ID, name, gender, affiliation group, mobile phone number, ID card number, IC card number, ethnicity, nationality, date of birth, contact address and remarks, add face recognition photos and click "Save" to complete the visitor operating.
Upload a face recognition photo description
Upload from local
Click "Upload from local" to open the local folder, select the jpg and png portrait photos in the folder.
Note: Portrait photo specifications
1. Please choose a front-and-bareheaded photo in the past three months, with clear and even-light image.
2. The recommended size is 640 px * 480 px, and the size does not exceed 500kb. Only jpg and png file are supported.
3. Faces should account for more than 1/3 of the photo, avoiding photo blurring, wearing sunglasses, excessive facial-up, and head rotations.
Register from device
Click "Register from Device" to open the Select Device window and select an online device. Once determined, the device will enter the photo state. After the photo is taken and verified, the photo will be sent back here from the client.
4.2.2 Export visitor information
In [Visitor management], click the "Export" button to export all visitor information in the list to the file "Visitor information.xls" and download it.
4.2.3 Refresh visitor information
In [Visitor management], click the "Refresh" button to refresh all visitor information in the list to the latest state.
4.2.4 Visitor details and editing
· Visitor details
In [Visitor management], after corresponding visitor information, click the "Visitor details" button to enter the details page to view specific visitor information.
· Visitor edits
On the details page, click the edit button to modify the visitor's basic information and photo information. After modifying the information, click Save.
4.2.5 Visitor grouping management
Guest grouping uses the organizational structure grouping by default. Each user group has a default guest grouping, which can add, modify, and delete guest groups on the user grouping. The operation is similar to the user grouping in the [Group structure], which is not described in detail.
4.3 Blacklist management
Blacklist management is used to view, add, edit, and export blacklist information.
4.3.1 Add blacklist individually
Steps:
1) In [Blacklist management], click the "Single Add" button to enter the blacklist addition page.
2) Fill in the blacklist ID, name, gender, belonging group, phone number, ID card number, IC card number, ethnicity, birthplace, date of birth, contact address and remarks. Add face recognition photos and click "Save" to complete the blacklist create operation.
Upload a face recognition photo description
· Upload from local
Click "Upload from local" to open the local folder, select the jpg and png portrait photos in the folder.
Note: Portrait photo specifications
1. Please choose a front-and-bareheaded photo in the past three months, with clear and even-light image.
2. The recommended size is 640 px * 480 px, and the size does not exceed 500kb. Only jpg and png file are supported.
3. Faces should account for more than 1/3 of the photo, avoiding photo blurring, wearing sunglasses, excessive facial-up, and head rotations.
4.3.2 Export blacklist
In [Blacklist management], click the "Export" button to export all the blacklist information in the list to the file "Blacklist information.xls" and download it.
4.3.3 Refresh blacklist information
In [Blacklist management], click the "Refresh" button to refresh all the blacklist information in the list to the latest state.
4.3.4 Blacklist details and editing
Blacklist details
In [Blacklist management], after corresponding to the blacklist information, click the "Blacklist details" button to enter the details page to view the specific blacklist information.
· Blacklist edits
On the details page, click the edit button to modify the basic information and photo information of the blacklist. After modifying the information, click Save.
4.3.5
Blacklist grouping management
The blacklist
group uses the organizational structure group by default. Each user group has a
default blacklist group. You can add,
modify, and delete blacklist groups on the user group. The operation is similar
to the user grouping in [Group Structure].
The blacklist group uses the organizational structure group by default. Each user group has a default blacklist group. You can add, modify, and delete blacklist groups on the user group. The operation is similar to the user grouping in [Group Structure].
Related Articles
Setting up access management and permissions
5.1 Access Management records View all the identification records on the device, which can be grouped and filtered by device. The data body temperature value is greater than or equal to 37.3 degrees to display red font, less than 37.3 ...Add new devices and managing devices
3.1 Device list [Device List] It contains all device information connected to the system. You can perform single, multiple, and grouping management operations on the device. 3.1.1 Parameter settings Select the ...How to use the admin settings on the tablet?
8.1 Client login Steps: 1) After opening the application on the device, click the middle mouse button to pop up the Accessword input box and enter the default Accessword: 123456 to enter the settings page. 2) Click Login Management to enter ...Using attendance management
7.0 Attendance rules [Attendance rules] Add, modify and delete related rules including shifts, holidays, public holidays, and device groups, etc. are set in this module. 7.1.1 Shift settings The shift setting contains a ...Using the system management options.
6.1 Group structure [Group structure] The module is used to manage the group structure and enterprise user information management in the enterprise. The hierarchical relationship is created and managed by admin or enterprise administrator ...