How to use the admin settings on the tablet?
8.1 Client
login
Steps:
1) After opening the application on the device,
click the middle mouse button to pop up the Accessword input box and enter the
default Accessword: 123456 to enter the settings page.
2) Click Login Management to enter the login interface. Enter the same account Accessword as the web page to log in.
Note: You need to enter the set device Accessword
before entering the login management, after logging into the application
settings and before exiting the application. The Accessword can be set in the
"Parameter setting" in the [Device management] on the backstage web
page or can be modified in the "App Accessword Settings" in the
terminal application settings.
Application management
After successful login, click the middle mouse button
to open the [Application management] interface. The current page displays the
login information: local name, local IP, connected server, current login
status, and login management, application settings, face entry, application Six
functions of information, Access record and face databaseLogin management
After logging in, you can click "Sing out" to
log out of the current account.
8.2 Application settings
Enter the [Application settings] page, which contains the
following function settings:
8.1.1
Device name setting
By default, the device name is the MAC address
of the device, which can be modified manually. After being logged in, it will
be synchronized to the background after modification, and can also be set in the "device details" in the [device management] of the background
web page;
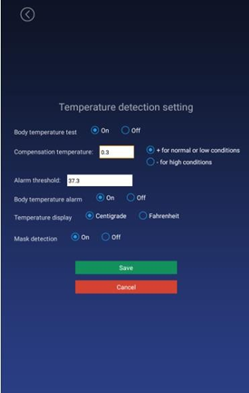
8.2.2 Body temperature setting
1) Control body temperature detection function. You can choose to turn on or off, the default is on.
2) On: During the identification of personnel
traffic, the interface will display and broadcast the body temperature value
after the face is recognized.
3) Off: During the recognition of personnel traffic,
the outline of the face in the interface is automatically hidden. The interface
will not detect body temperature after the face is recognized.
Compensation temperature
1) When the ambient temperature may affect the
detected body temperature, the compensation temperature can be set to adjust automatically.
2) The compensation temperature value defaults to 0.3, and the setting
range is 0 ~ 1, and a maximum
of one decimal can be reserved; "compensation +" is selected
by default.
Example: Compensation +0.3 degrees, the
problem is 36.1 during identification, then 36.4 is displayed.
Alarm threshold
Set an alarm threshold to control body
temperature detection. When the body temperature alarm is turned on, the identified body temperature exceeds
the threshold and an alarm
is issued. The default is
37.3, and only numbers between 30.0 and 45.0 can be entered, and up to one
decimal can be reserved.
Body temperature alarm
1)
Control body
temperature alarm function. You can choose on or off, the default is on.
2) On: When the detected body temperature is higher
than the threshold, the interface displays the body temperature and emits an
alarm sound; if the body temperature is lower than the threshold, there will be
no alarm.
3) Off: No matter the body temperature is high or low, there will be no
alarm.
Mask detection
1) Control the mask detection function. You
can choose to turn on or off this function, the default is off.
2)
On: Recognize without wearing a mask. After recognition, the display style
is a red background. Access is prohibited. Please wear a mask. The voice broadcast "Please wear a mask"; wearing a mask can be
recognized normally.
3) Off: Does not detect whether to wear a mask during
recognition.

8.2.3
Identification parameter setting
Test threshold
It is used when checking the pictures into the
warehouse. The higher the threshold is set, the lower the requirements on the
pictures. It needs to be set reasonably. The default value is 17.
Number of recognitions
The number of times to identify whether a person is an already-entered person, the default value is 3.
Living portrait detection
Whether to enable live detection when recognizing
personnel can be set to on or off, and the default value is off.
8.2.4 Volume setting
While logged in, the volume setting of the
synchronization server can also be set locally.
8.1.1
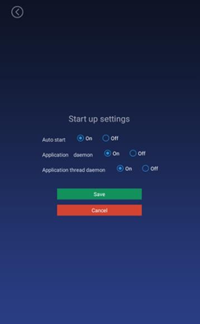
Start-up settings
Auto-start
The application will start automatically when
it is turned on, and it will not start when it is turned off.
Application daemon
The application will automatically jump back
to the playback interface within 30 seconds after opening the application page
when opening, and not automatically when closing.
Application thread guard
When the camera is
turned on, an abnormality occurs and the camera restarts

8.2.6
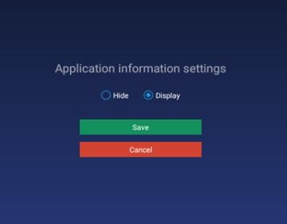
Application information settings
After setting, the camera
displays or hides the bottom information bar in full-screen display; default:
display, which can be set to show or hide

8.2.7
Recognition effect display
Set the effect of face recognition, including
the display when the recognition is successful (the default value displays the image)
/ when the recognition fails (the default value is turned on the red light), the fill light
display (the default value of the three-color light), as shown in the figure:
8.2.8
Application Accessword settings
1)Enter the login management, enter the application settings after login,
and exit the application before you need to enter the set device Accessword,
the initial Accessword: 123456.
2) The Accessword can also be set in the
"Parameter Setting" of [Device Management] on the background web
page.
3)Enter the original Accessword, new Accessword, confirm the new
Accessword, and save it to modify the Accessword; the Accessword length limit:
1-6 digits, cannot be set to blank.
8.2.9
Camera preview resolution setting
Set the camera resolution when performing face
recognition. The default value is 1280 * 720.
8.2.10
Screen-saver brightness setting
Screensaver
1) When face recognition is not required, a
screensaver is required. After recognizing a face, jump to the home page.
2) The app starts to display the homepage, there
is a face recognition homepage within 30s, and no face recognition screensaver
within 30s.
Screen-saver brightness setting
8.2.11
Device restart time setting
8.1.1
Relay settings
Relay mode:
0: indicates no automatic closing mode, that
is, it will not automatically close after opening the relay, the default value.
1: Indicates automatic
closing mode (high
effective-default low level,
then high level for X seconds, and finally low level). That
is, after opening the relay, a delay
of X seconds will automatically close.
2: Indicates auto-close mode (active
low-default low level, then high level for X seconds, and finally low level).
That is, after opening the relay, a delay of X seconds will automatically
close. Delay time: The default unit is 5 seconds
and the maximum value is 63 seconds.
8.2.13
Others
Upgrade firmware of temperature module
The firmware of the temperature measurement
module can be manually upgraded through application settings. First insert the
U disk, and then enter the temperature measurement module upgrade function of
the application settings to select the firmware that can be upgraded for manual
upgrade. After the upgrade, you can view the version number of the new firmware
of the temperature measurement module. (The firmware file needs to be placed in
the root directory of the U disk, and the file name must be updateTemp.bin
8.2.14
Application initialization
The application initialization function will clear all data in the application and restore it to its initial state, including user login information, entered face information, access records, and settings in the application settings
Call-back settings
1) This setting includes on and off.
2) On: You need
to enter the callback address, the callback address is implemented according to
the callback interface
document provided by us.
3) Off: The callback function is turned off; the recognition record is not
callback.
8.3
Face portrait entry
You can enter personnel information locally,
collect faces, enter employee ID, name, gender, and save. After the entry is successful,
it will be synchronized to the background; after the face is collected, the
picture will be verified, and the verification result will be displayed.
8.4
Personnel import in bulk
In addition to a single-entry method, you can
also import personnel to the client in batches via a U disk. The import method
adopts excel format and folder method. The detailed operation steps are as follows:
1. Create importVip directory with U disk.
1 Insert the USB port of the device after it is created and import it automatically. The current total number of imported people, successful people and failed people will be displayed.
8.5 Access records
By default, the travel records of the current
day are displayed, and the data of the travel records can be queried and
exported by day (the data of the current day is displayed by default, and the
export record needs to be inserted into a U disk). The name, identity, time of
Accessage, temperature and snapshot of the Accessage will be displayed.
8.6 Application information
8.7 Face database
The face database page can view the face database information of the current device. The list will display the name, identity, expiration date, type and pictures. Records can be deleted, and local
Personnel can also be uploaded to the background APK.
8.8 Identify the home page
Homepage description
The top information bar: The time information bar will automatically synchronize the server 1) time and day of the week.2) Camera screen: The camera screen is displayed in full screen, and the recognition result is displayed when Accessing through.
3) The bottom information bar: The company name, number of people, photo, MAC address, IP address and version number will be displayed.
1. Company name: The default is to set the company name, which can be set through the background.
2. Number of people and photo information: The number of people refers to the total number of people in the device, and the number of photos is the number entered in the face database, which changes automatically after synchronizing data.
3. MAC address: It is the mac address information of the current device.
4. Version number: the current version number of the client.
5. IP address: It is the current IP of the client. If there is no address, the display is blank, and the address needs to be displayed dynamically.
Access recognition
It can be identified based on the person's identity. You can also check the body temperature of the identified person, whether to wear a mask, and display the identification results.
8.9 Others
Person & Paper Comparison
The client accesses the ID card to identify the peripherals, and the device ID is set to "Person & Paper comparison". Swipe the ID card on the peripheral device. When the ID card matches the currently recognized person, the gate will be opened.
Client languages
The English version has been adapted. After exiting the client, the system language is set to English, and the interface automatically changes to the English version after entering the application.
Related Articles
Using the system management options.
6.1 Group structure [Group structure] The module is used to manage the group structure and enterprise user information management in the enterprise. The hierarchical relationship is created and managed by admin or enterprise administrator ...How to connect the server to the unit
Step 1: Install the CMS software in a PC/ Server that is connected to LAN/ WiFI Step 2: Use the middle mouse button on the unit and login to the unit. Step 3: Once successfully logged in, go to Login Settings, there will be an option to auto-detect ...How to set up email notifications?
Email notifications can be enabled for abnormal temperatures observed. Please follow in the instructions in as per the manual. Once the email is configured properly, please use the test button to test and confirm if the email setting is working ...Add new devices and managing devices
3.1 Device list [Device List] It contains all device information connected to the system. You can perform single, multiple, and grouping management operations on the device. 3.1.1 Parameter settings Select the ...Installing the kiosk software or central management software
Please review this article to download the software https://support.kriosk.com/portal/en/kb/articles/where-can-i-find-the-setup-file-for-the-software-2-9-2020 One-click installation: Double-click the exe installation file and follow the installation ...